Category Archives: SharePoint 2010

SharePoint 2010

Some farm products and patches were not detected

When patching a lot of SharePoint farms, you tend to come across a lot of different issues, I’ve noticed this issue come around more often than most in load balanced farms (which is every farm nearly!).

So the scenario I have a lot is patching 3-6 servers, when patches are applied, I run the PSConfig command or PSConfigUI and this is where the issue happens.

SharePointProductsConfigWizError

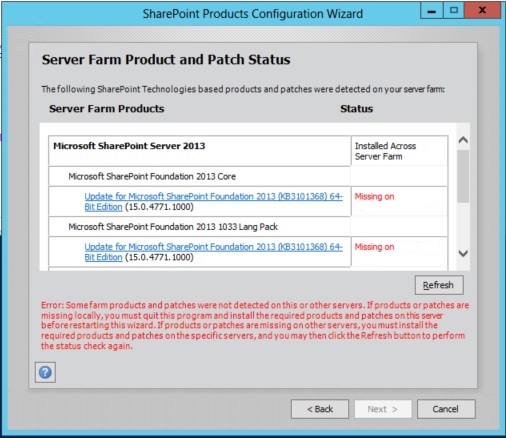
From the image above, when I try to run PSConfigUI I get the error, this is after patching all the servers in the farm and waiting to run the config wizard. SharePoint seems to think the rest of the servers in the farm don’t have the patches required however, I’m 100% sure these were installed on each server.

So how would I get SharePoint to understand that every other server in the farm has this patch that’s required? Well after a little digging in PowerShell I’ve found a command that gets the product on a local machine.

Patching1

If you only run this on one server, you’ll notice the error again. To fully correct this, you’ll need to run this on every server you’ve patched in your farm so the config wizard can recognise the patch level applied.

SharePoint Still using old name

So I find this issue comes about a lot of the time for female users, reasons being is when they get married, they take the mans surname. So when their name changes in AD, this doesn’t automatically reflect the same in SharePoint.

When Active Directory Syncs with SharePoint User Profile Service, it also does a sync in parallel with the User Information List (UIL). When new users are added or modified, these users will be added to the UIL. Unfortunately, when user names are changed, this doesn’t always update the UIL and therefore creates a second account for the new updated surname account.

To fix this, we have to merge the accounts together and delete the old one. Without carrying this out, you will probably notice that SharePont still uses your old account which you’ll notice in the top right corner of SharePoint.

So firstly you can check the UIL by going to the url below

http://YOURSITEHERE/_catalogs/users/simple.aspx

Following that, you’ll get a list of users that are in SharePoint, you can also find the users by going to Site Settings, People and Groups. Change the URL at the end to look at MembershipGroupId=0, the full URL can be seen below using my own site.

http://sharepoint-oc/_layouts/15/start.aspx#/_layouts/15/people.aspx?MembershipGroupId=0

From here, you’ll notice two accounts for one user, so we’ll need to merge these using PowerShell and then delete the old.NameChange2

$user = Get-SPUser -Identity “CHIN\MDean” -Web “http://SharePoint-OC/”
Move-SPUser -Identity $user -NewAlias “CHIN\MTravis” -IgnoreSID

The script above moves your old account to the new account with the new surname. Including the permissions that were there.

Once Completed, go to the link below again and delete the old user.

http://sharepoint-oc/_layouts/15/start.aspx#/_layouts/15/people.aspx?MembershipGroupId=0

It might require the user to log out and in for the update however, I’ve seen it just change without needing it sometimes.

Modifying New Item form to delete/rearrange columns

Another request I’ve had is to hide columns on the new item form which in my case required the use of SharePoint Designer again. Details below.

  1. Within SharePoint Designer navigate to your list, create a new item form and edit in advanced mode (right click to edit in advanced mode).
    editformeditinadvancedmode
  2. Search for your column name and highlight the code within the <tr></tr>, this can then be re-arranged in order or deleted as per the below, save the form and preview in browser.
    newformremovecolumn

Promoted Links – Change amount per row and next page icon

While testing promoted links I came across an issue whereby I had too many links on a row and was displaying an arrow to view the rest of the icons which looked fairly awful. A way around this was to use a Script Editor WebPart to modify the page layout through CSS.

  1. On the page displaying the Promoted Links, click the cog and go edit page.
  2. Add the Script Editor WebPart which can be found under ‘Media and Content’.
  3. On the right side of the Script Editor WebPart you will see ‘EDIT SNIPPET’, click this and insert the code below into it.
    The first part of the code limits the amount of links per row, each tile has a default of 160px, so depending on the amount per row its 160*… The second part hides the arrows if there’s more items that you are currently unable to see.

    <style>
    /*display rows of 6 items*/
    .ms-promlink-body {
    width: 960px;
    }
    </style>

    <style>
    /*hide the arrows when you have more items than viewable*/
    .ms-promlink-header{
    display:none;
    }
    </style>

Prevent users from editing a column

A recent request I had was to prevent users from editing a column once the item had been created. This had to be done in SharePoint Designer, sure you can get around this with the quick edit option in SharePoint however, in my list quick edit was turned off to prevent this.

  1. Open SharePoint Designer and navigate to the list, create a new edit form and edit in advanced mode.
  2. Look for your column name and find the control mode within the SharePoint:FormField line. You will notice the ControlMode is usually set to ControlMode=”Edit”, change this to ControlMode=”Display”, save the form and check SharePoint for the results.<td width=”400px” valign=”top” class=”ms-formbody”>
    <SharePoint:FormField runat=”server” id=”ff6{$Pos}” ControlMode=”Display” FieldName=”DueDate” __designer:bind=”{ddwrt:DataBind(‘u’,concat(‘ff6′,$Pos),’Value’,’ValueChanged’,’ID’,ddwrt:EscapeDelims(string(@ID)),’@DueDate’)}”/>
    <SharePoint:FieldDescription runat=”server” id=”ff6description{$Pos}” FieldName=”DueDate” ControlMode=”Edit”/>
    </td>

    The end result is shown below, this is the edit form in SharePoint.
    DueDate

Hide Lists or Libraries from Site Contents page

In the Site Contents page, there can be many lists, libraries or other apps. While searching for a specific item this can be difficult if there are over 50 apps on the screen, some lists may just be used for back end results such as look-ups. So hiding lists and libraries that aren’t being used is simple, alternatively you could just Ctrl F the page and search your for your list. This change requires SharePoint Designer.

  1. Open SharePoint Designer and navigate to your list or library. On the information page, under settings is a tick box for “Hide from browser”, once ticked this will no longer show in SharePoint.
    HideFromBrowser

    Unfortunately, if you are wanting to unhide this, it will no longer display in the lists and libraries in SharePoint Designer (SPD). You will be required to go to the ‘All Files’ object and choose lists, this will then show the list that’s hidden. Find your list, right click and go properties, then remove the check box to hide the list.

Modifying the Ellipses

Within SharePoint the ellipses is used on the title column which is standard out of the box, unfortunately in my scenario the title column wasn’t being used and therefore, needed to transfer the ellipses to another column. This requires SharePoint Designer to change the column to what you want.

  1. Within SharePoint Designer, navigate to the list or library of your choice, in my case I’ve chosen a list. Within the list, choose a view to modify (usually the default view), right click the view and choose “Edit File in Advanced Mode”.
  2. Search for “<View Name=“, this is usually the longest line towards the bottom of the code. Find the part which states <FieldRef Name=”Your-Column-Name” /> and add ListItemMenu=”TRUE”. The end result should look like the below.
    ListItemMenuCode
    When you check the result in SharePoint, the ellipses will now be showing on your new column.
    HighMediumLowEndResult